Installation
Before you begin with the installation of the Teleport please read the following checklist.
- You need to have in depth knowledge of the assets you are dealing with, such as PV installations, meters, batteries, EV, wind turbines, generators etc.
- You will have to change the settings of the assets. Therefore, you need to have the login information of the assets.
- You will often have to log into the router and change settings there. Therefore, you need to have the login information of the router. Preferably, you have been in contact with Withthegrid to plan the installation beforehand. Withthegrid tries to be available for remote support, and without prior planning there is a risk we don’t have time reserved to provide support for the installation.
- You can reach out to Withthegrid via the Operations phone number: +31 (0)85 799 02 22.
The installation process of the Teleport consists of the following steps.
- Connect to the internet
- Connect to your asset
- Power it up
- Configure the Teleport
- Site acceptance test
- Start asset control
The device can be installed separately, in an industrial enclosure, with a DIN-rail mounting kit or in a server rack.
Connect to the internet
Internet connection through cellular
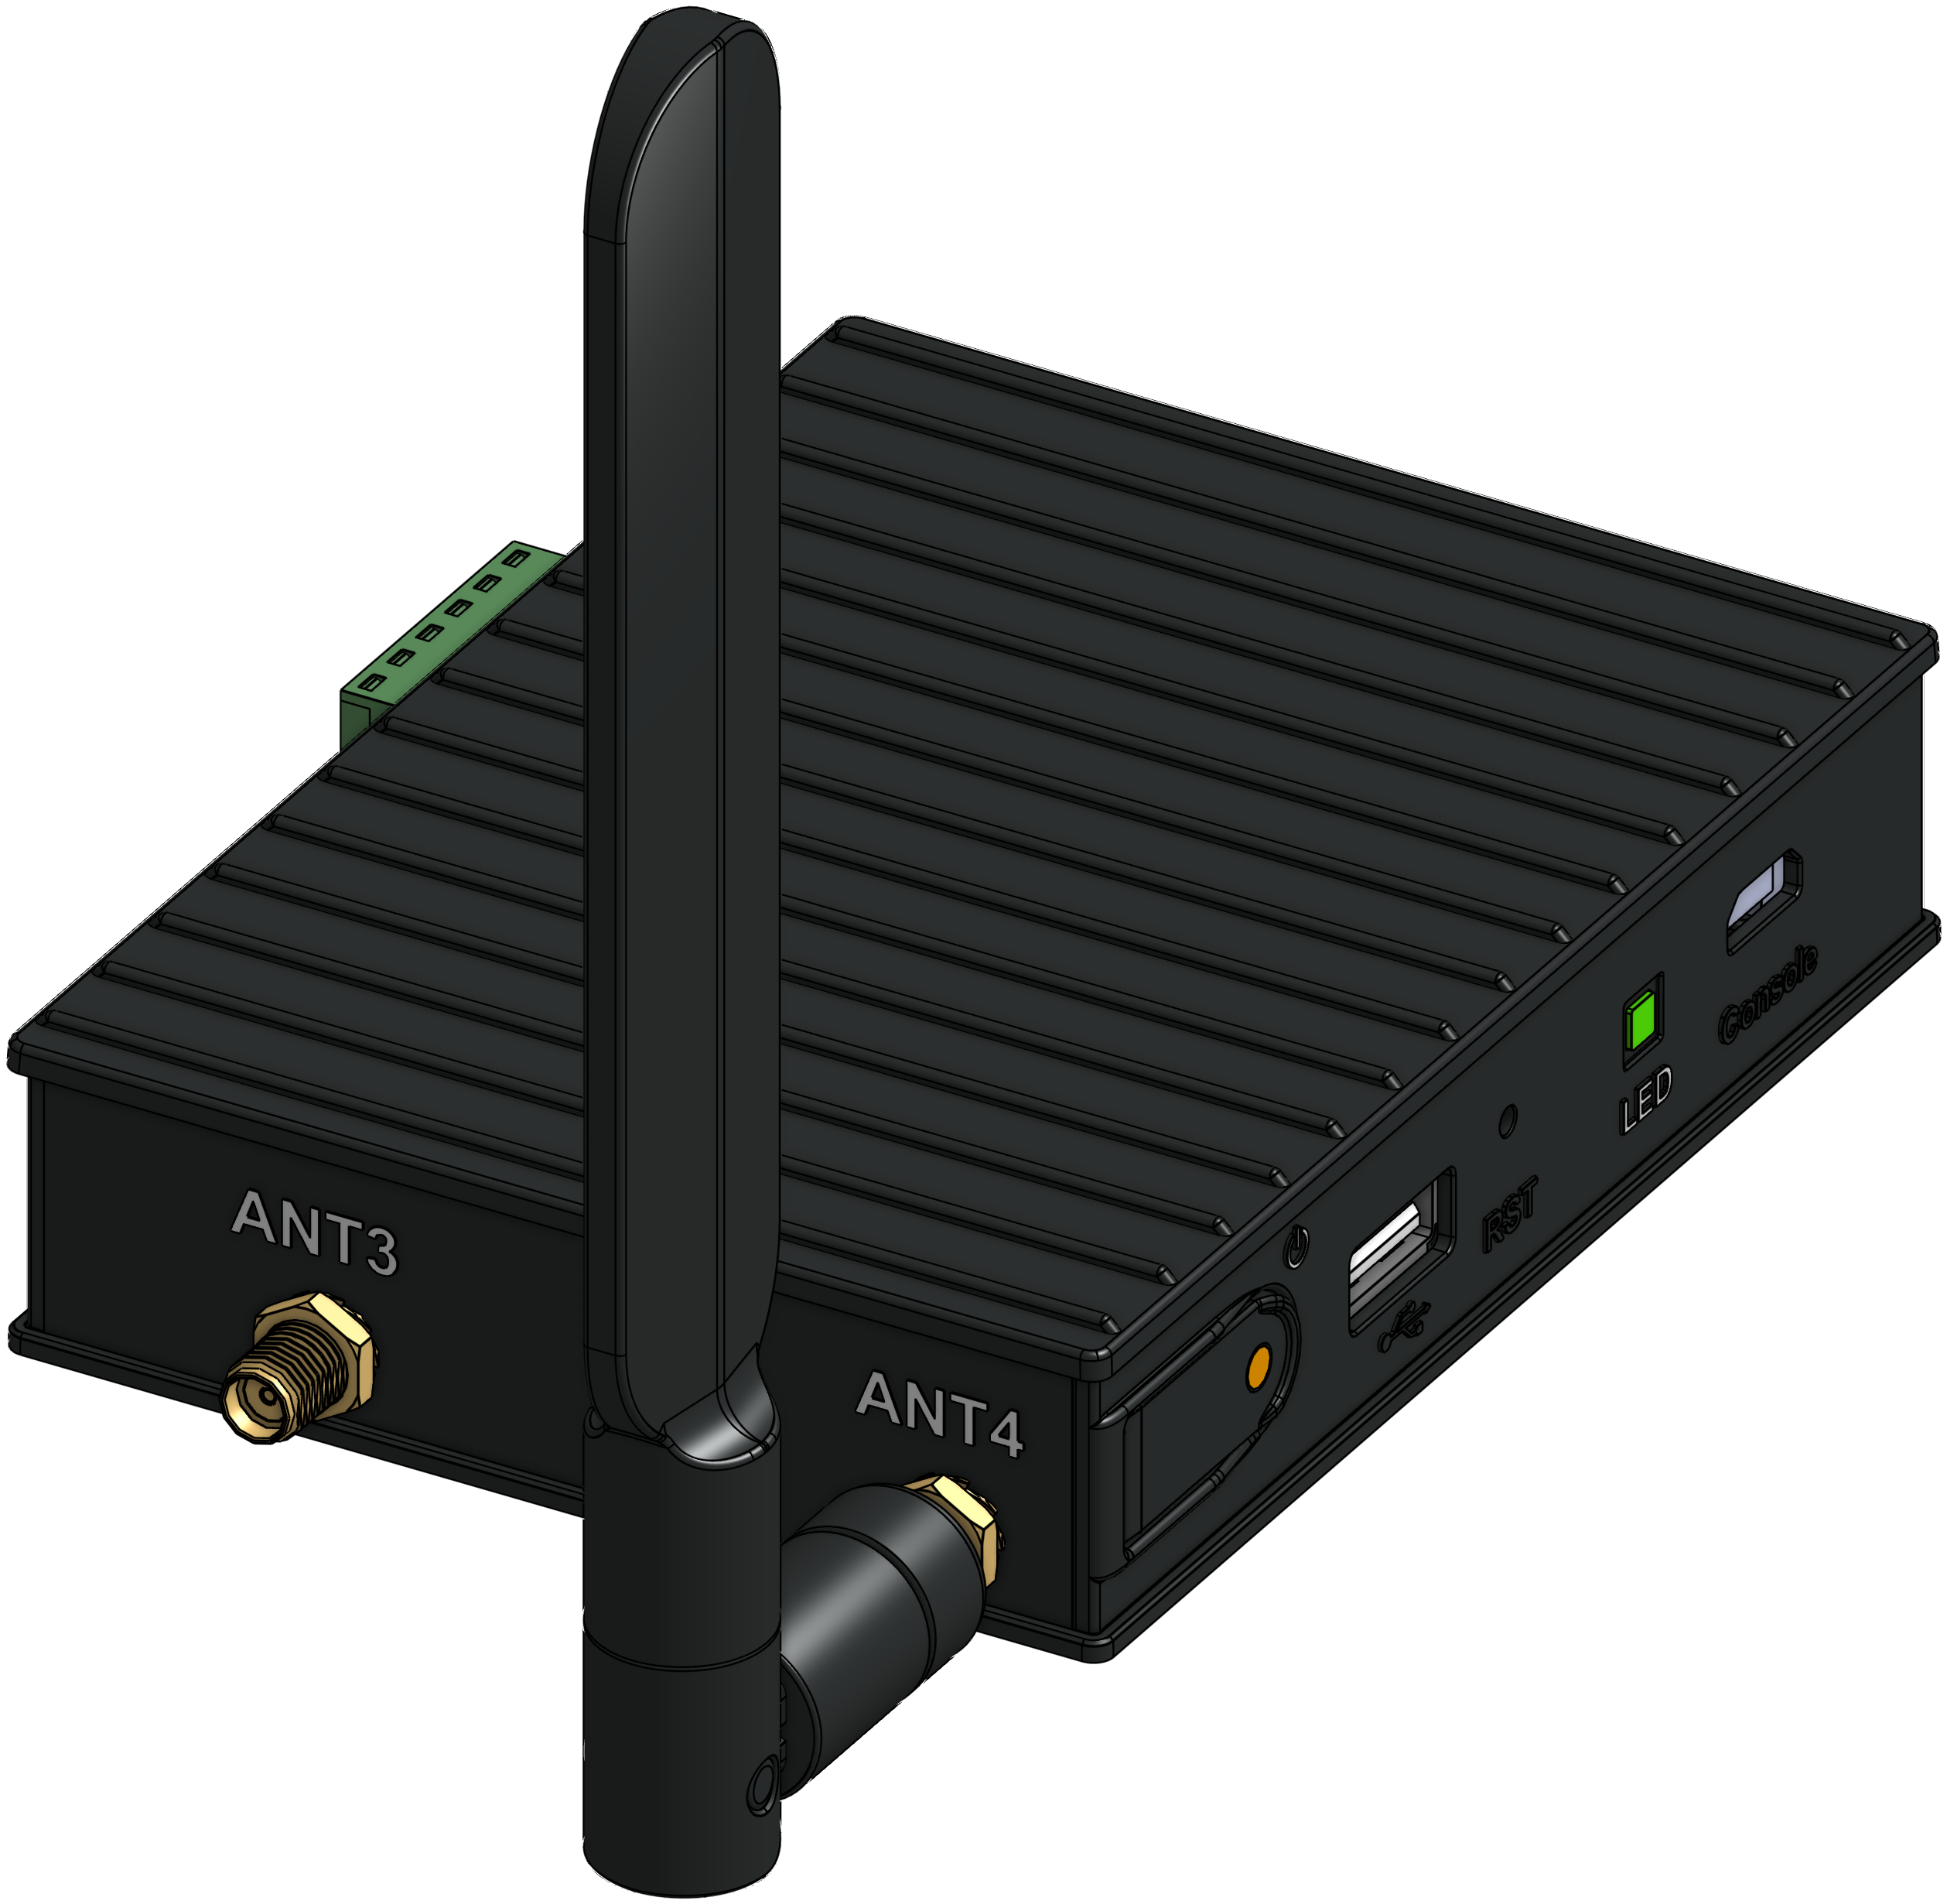
The Teleport will automatically connect to the Teleport cloud via cellular, as soon as the Teleport is turned on. The standard cellular antenna is connected to the ANT4 connector.
In case an external antenna is used, it should be connected to the ANT4 connector instead of the standard cellular antenna. It is important to always have the cellular antenna connected as it serves as a back-up when internet access via the ethernet port is down or as the only connection if no internet is available via the ethernet port.
Internet connection through a local network
The Teleport can also connect to the internet through a local network. Simply connect the ETH1 port to a router or a switch with an ethernet cable. The ETH1 port is pre-configured with DHCP enabled, so it will automatically receive an IP address from a DHCP server, such as a router.
The Teleport requires outgoing traffic on the following ports. If the Teleport is behind a firewall, please make sure to open the following ports for the Teleport’s outgoing traffic.
| port | transport protocol | protocol |
|---|---|---|
| 53 | UDP | DNS, used for domain name lookup |
| 80 | TCP | HTTP |
| 123 | UDP | NTP, used for time synchronisation |
| 443 | TCP | HTTPS |
Connect to your asset
The Teleport can connect to a number of different asset types. You can browse the Asset library for supported assets of the following types. Contact us at support@withthegrid.com if you do not see the type of your asset.
Each asset has to be configured, in order for the Teleport to read from and/or write to the asset. In the Asset library, the specific instructions for each asset are listed. When using Modbus TCP or Modbus RTU for communication between the asset and the Teleport, usually Modbus has to be enabled on the asset in some way. For Modbus RTU also the slave-id’s of the asset(s), and communication settings like the baud rate, stop bits and the parity have to be configured on the asset(s).
The instructions for each asset are specific and require some knowledge of how to log into the asset and how to navigate the menu. Read the instructions for the brand and model of your asset carefully and, if needed, also consult the manual of the asset itself.
Connecting through a router
If both the asset and the Teleport are connected to a router, it is recommended to have the Teleport use this connection to communicate with the asset. For reliable communication, it is important that the IP address of the asset, and optionally the IP address of the Teleport, don’t change over time. This can be done using DHCP reservations in the router and is described in the steps below.
- Connect the ETH1 port of the Teleport to one of the free LAN ports of the router or switch.
- Log into the router.
- Navigate to the list of connected devices and note the IP address of the Teleport and the asset(s) it should connect to. You can identify the relevant IP address using the device’s name, or its MAC address.
- Create a DHCP reservation, sometimes called a static lease, for the IP address of the asset(s). If the router doesn’t have such an option, log into the asset(s) and change its IP configuration from a DHCP client to a static IP address outside of the router’s DHCP pool, but inside of the subnet. Let us know the configured IP address(es) so we can update the Teleport’s configuration accordingly.
- Optionally, also create a DHCP reservation, like described in step 4, for the Teleport. This is only necessary when the IP address of the Teleport is used to whitelist the connection in the asset(s), e.g. on a Huawei smartlogger. If the router doesn’t have an option to create a DHCP reservation, let us know, and we can remotely set a static IP address on the Teleport.
- Now that the IP addresses are static, you can follow the asset-specific instructions using the IP address of the Teleport that you have received from the router.
Connecting an RS-485 serial connection
The Teleport can connect to one, and up to three, RS-485 buses. The main RS-485 port can be connected as shown below. Optionally, the Teleport can also have two RS-485 ports available on its add-on connector. Please see the schematics for details about the RS-485 connection to that connector.
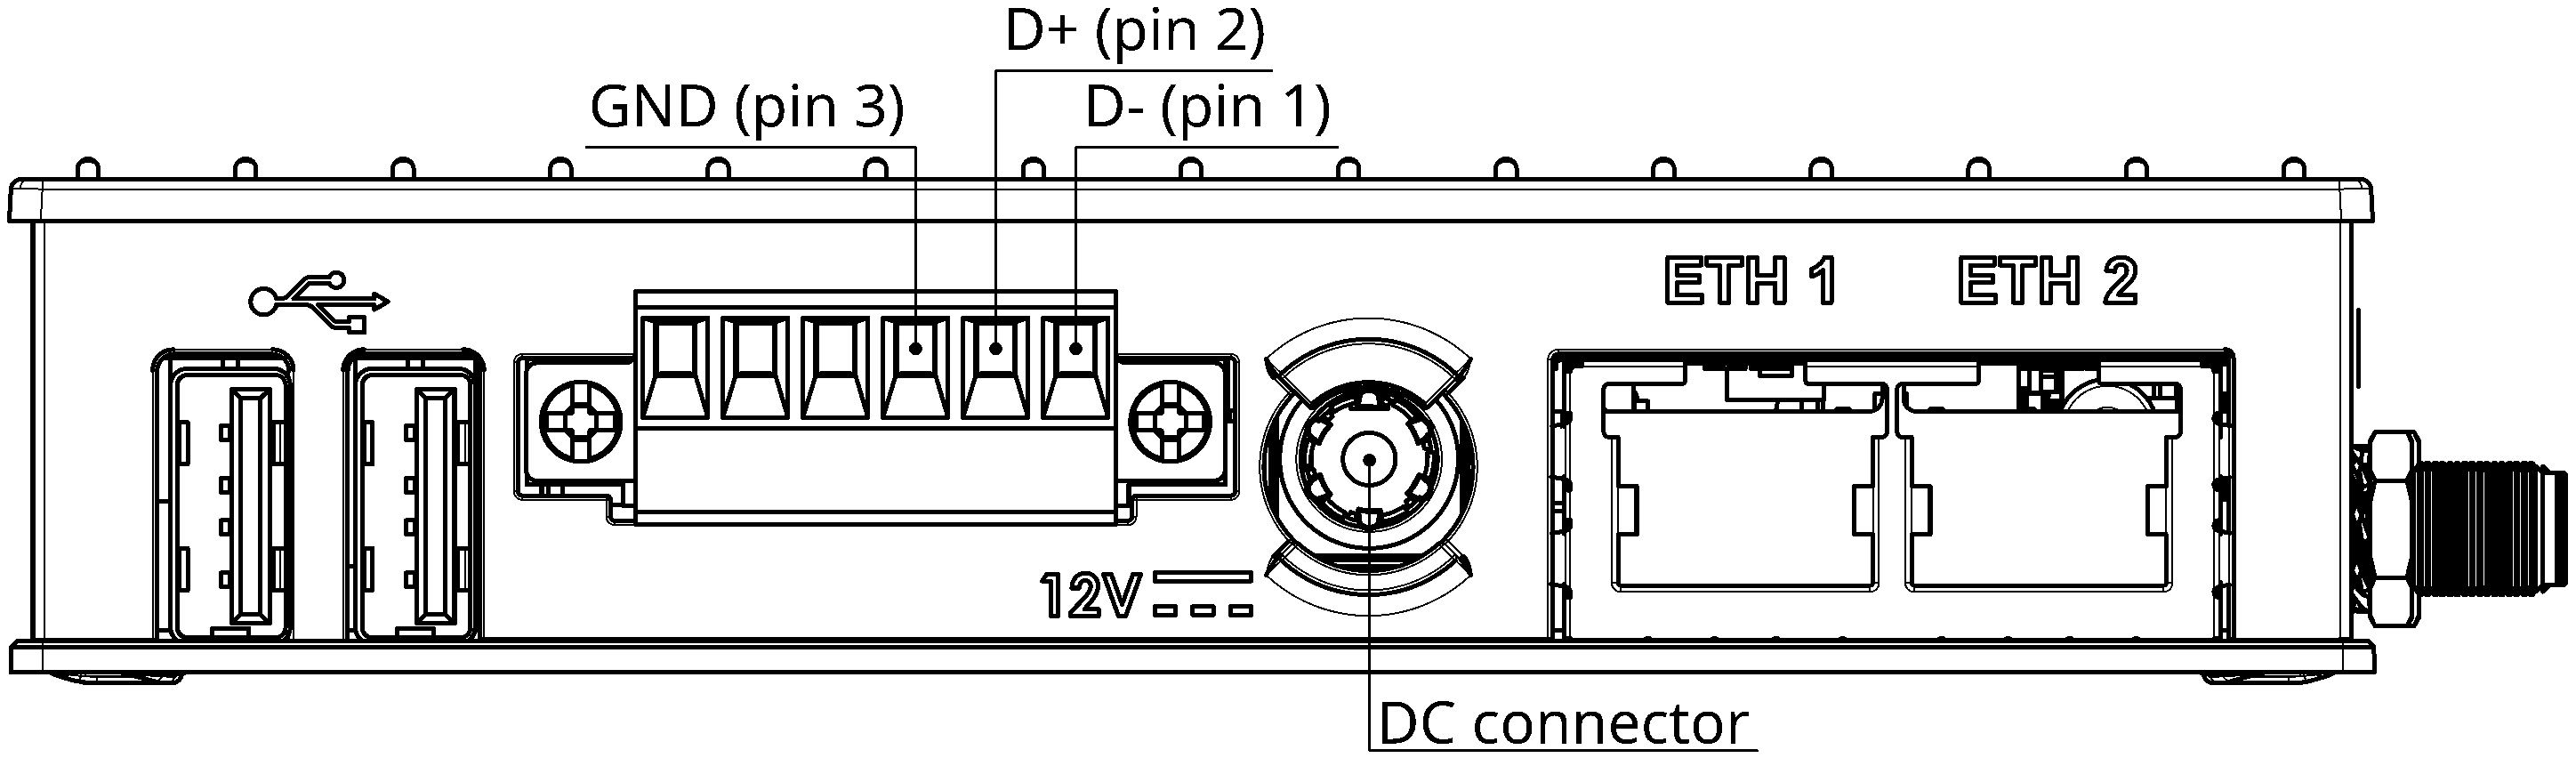
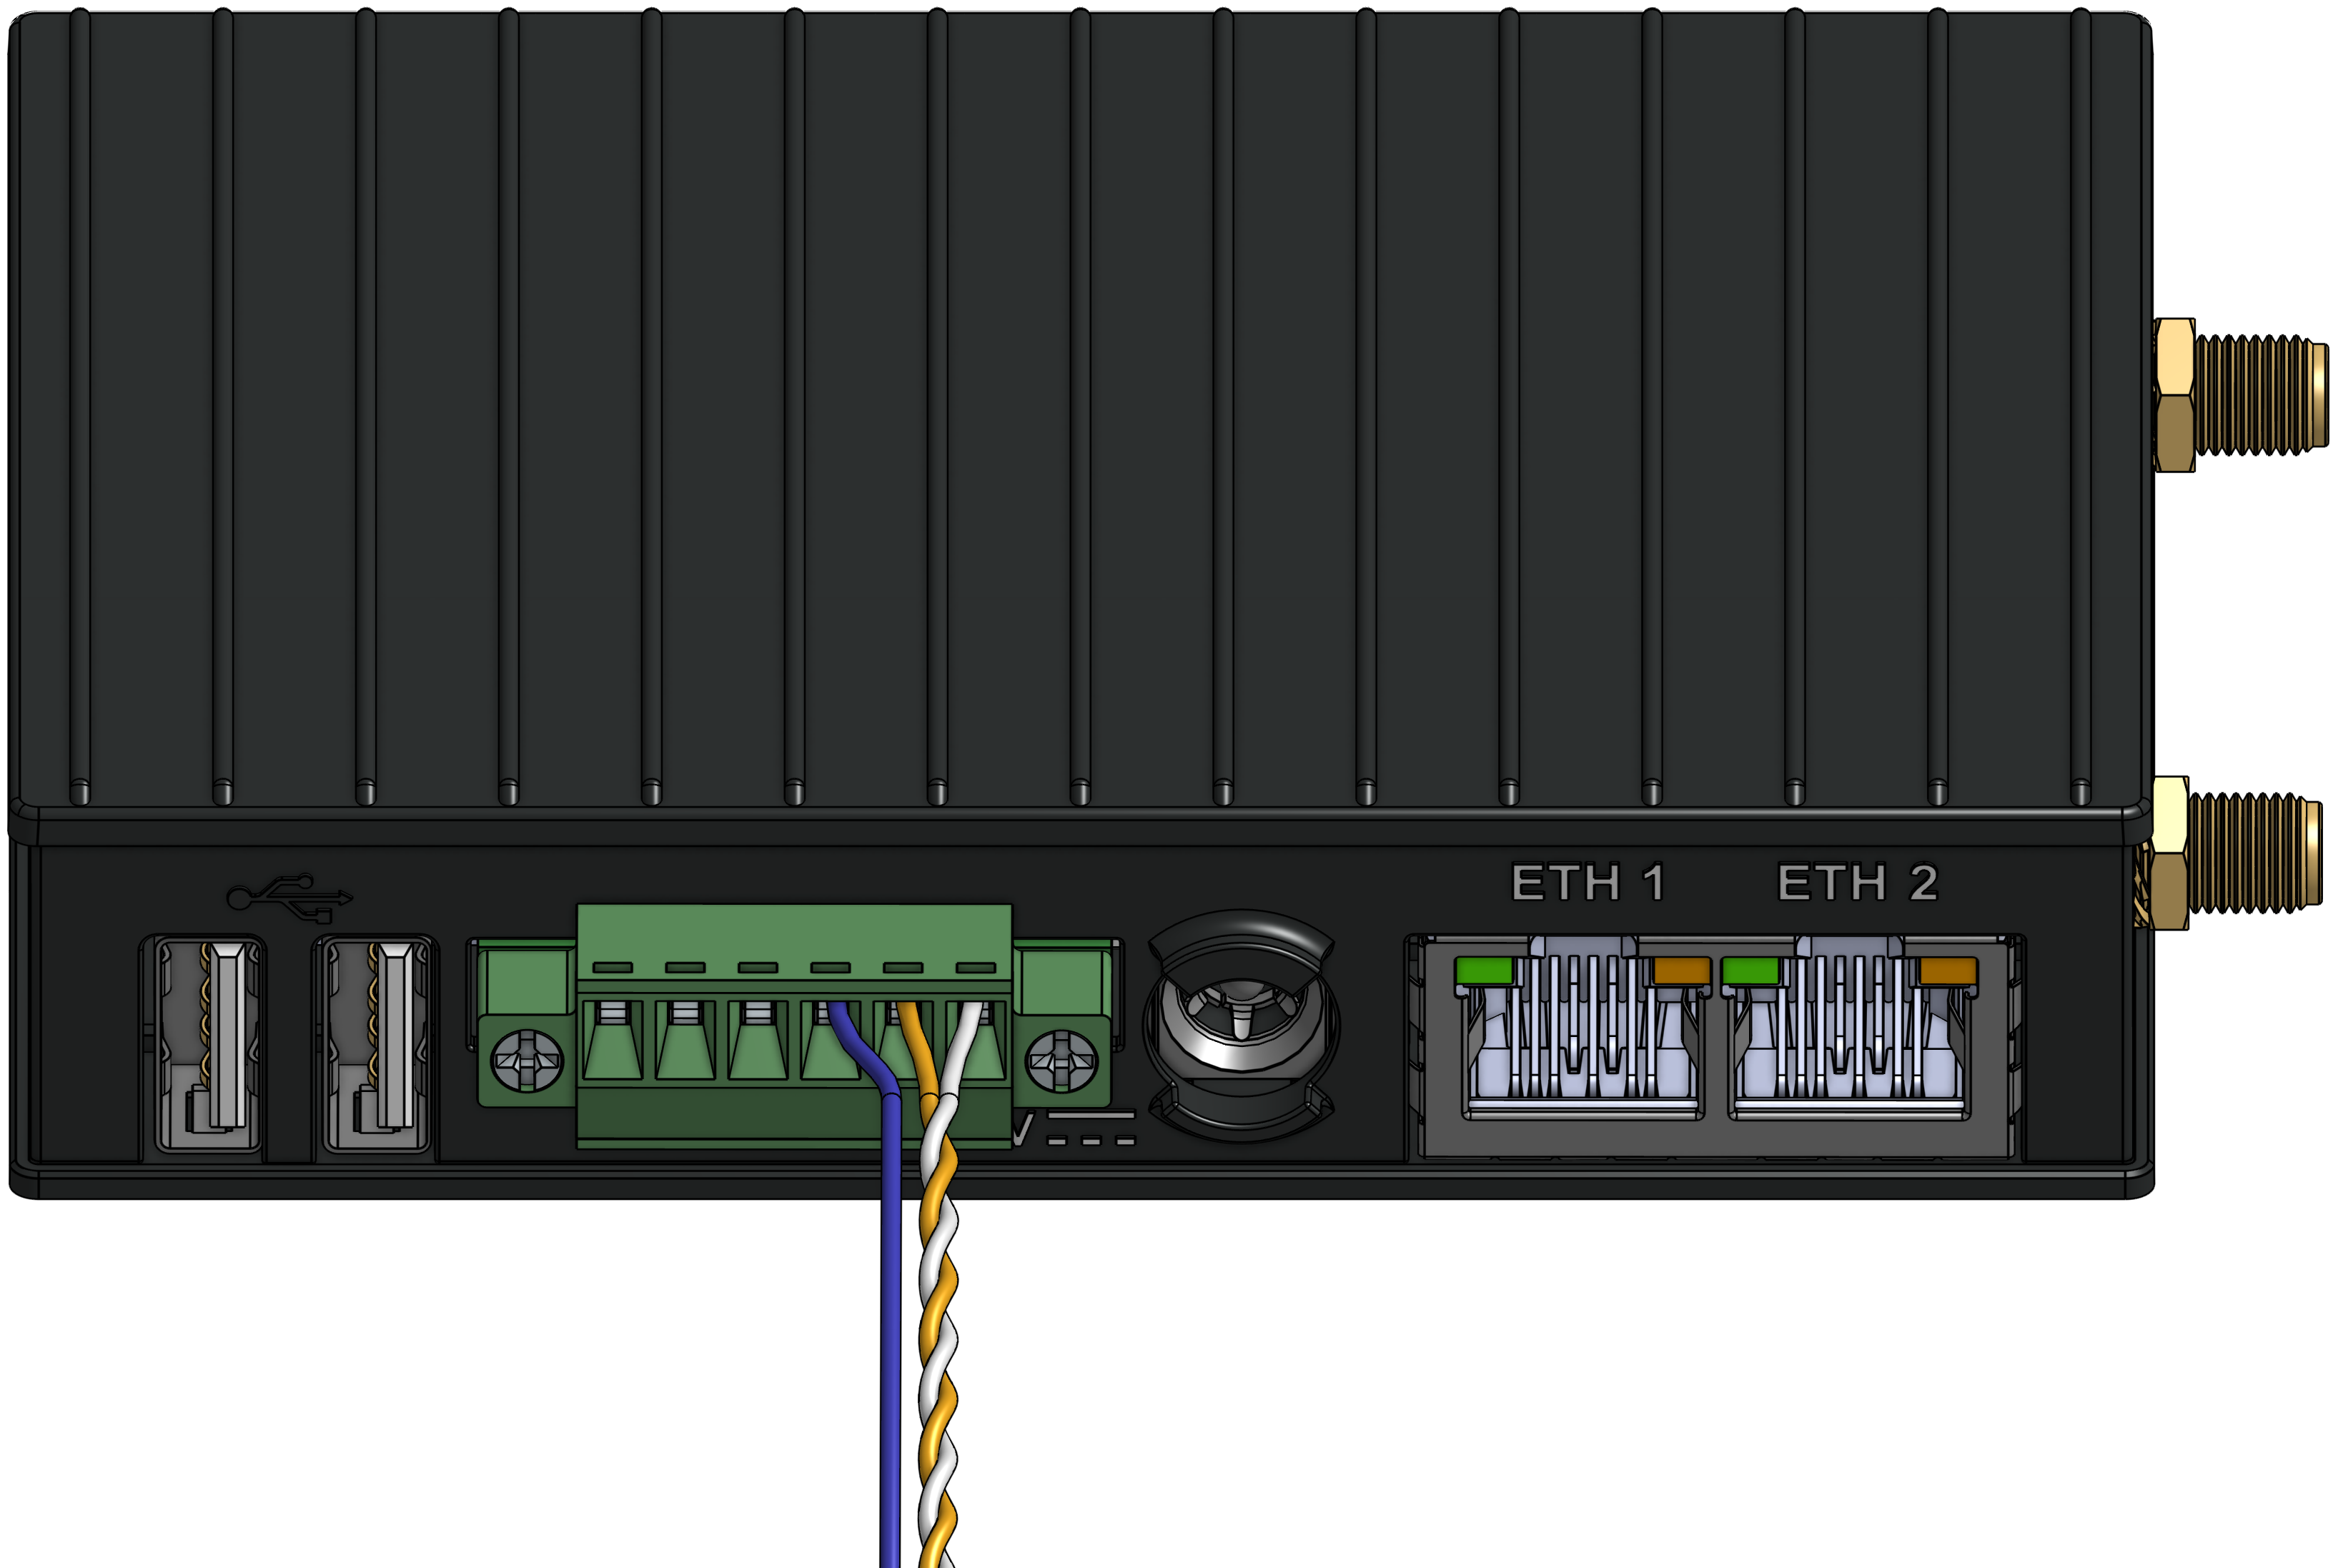
The RS-485 pin functions for the main serial connector are shown in the following table and the image below shows an example of an connected RS-485 cable.
| pin | RS-485 function | color |
|---|---|---|
| 1 | D- (A) | white |
| 2 | D+ (B) | orange |
| 3 | GND | blue |
Power it up
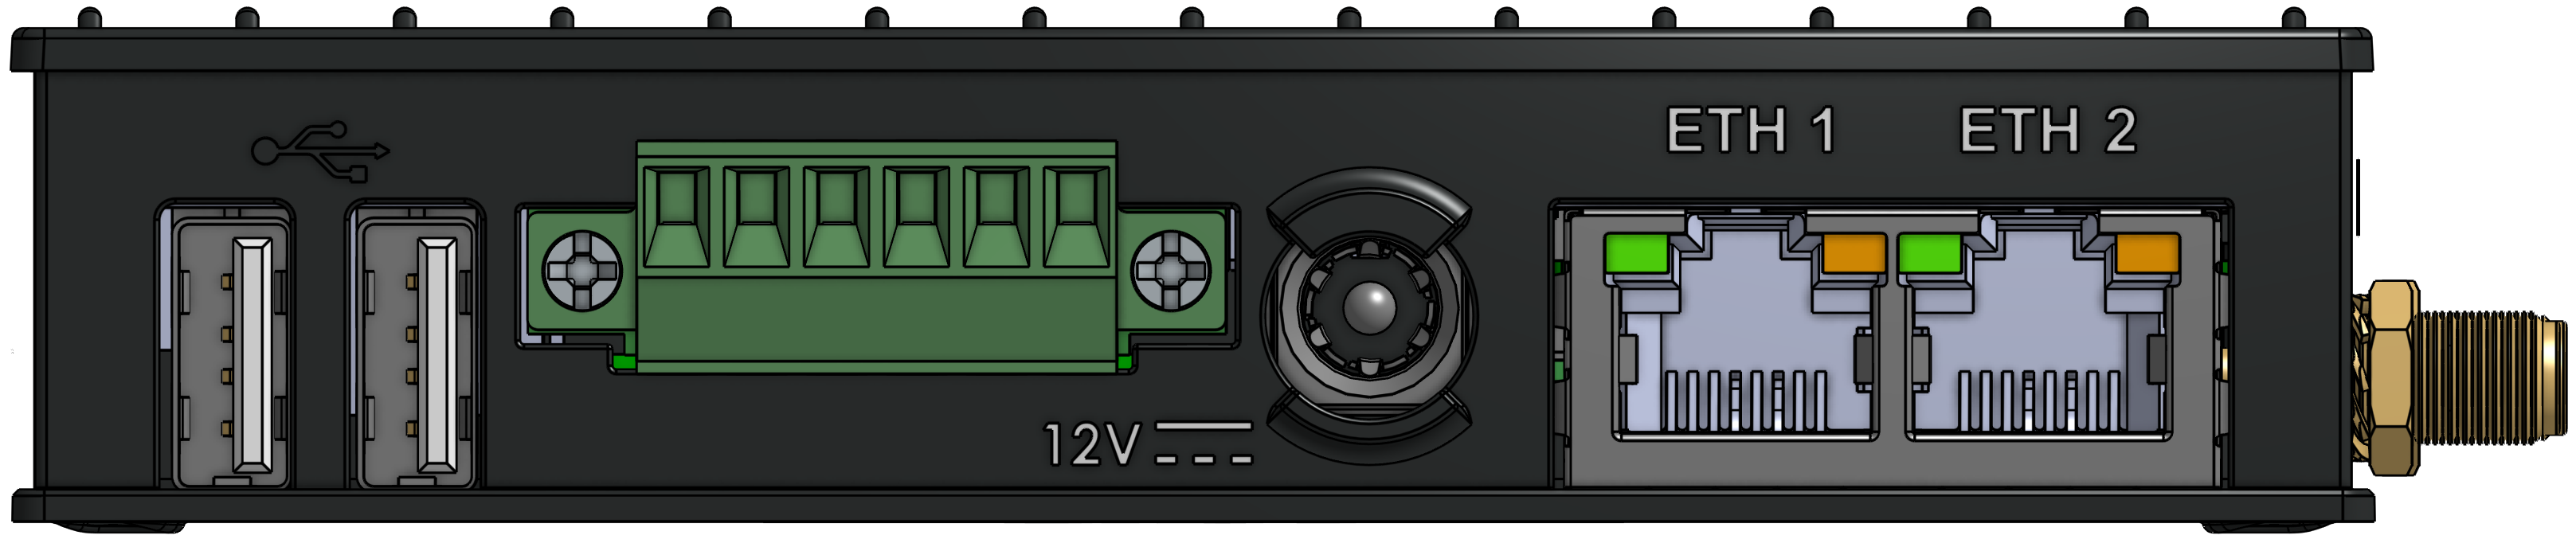
Connect the power supply to the DC connector of the Teleport and lock it in place by turning it clockwise. Plug the power supply into a power outlet to power up the Teleport, after which the Teleport will automatically start up and the orange power led will turn on.

When the Teleport is not getting any power its power led will be off.

Status led
The status led indicates the state of the Teleport.
- blinking orange: connecting to the asset(s) and the Teleport cloud

- orange: connected to all assets

- blinking green: connected to the Teleport cloud

- green: connected to all assets and the Teleport cloud

Restarting
The Teleport can be restarted, mainly upon request by Withthegrid, by using one of the following procedures.
Using the power supply
- Unplug the DC connector from the Teleport, making sure to unlock it by turning it counter clockwise, or unplug the power supply from the power outlet. Wait for at least 5 seconds and the power led will turn off.
- Plug the DC connector back in the Teleport, making sure to lock it by turning it clockwise, or plug the power supply back into the power outlet. The power led will turn on again.
Using the power button
- Hold the power button for roughly 10 seconds to power down the device. The power led will turn off.
- Press the power button again for a couple of seconds to start the Teleport back up. The power led will turn on again.
Configure the Teleport
The Teleport will be configured remotely by the Withthegrid team. We will configure networking, asset communication, read-out interval and control strategies. For this we will need information from you, which you configured in earlier steps.
Site acceptance test
At the end of the installation process, Withthegrid will perform a Site Acceptance Test (SAT). If the test is successful, the Teleport will be put into production, which means that the Teleport is visible and controllable through the API. During the SAT the following steps are taken:
- Test the internet connection and the signal strength of our internal cellular module.
- Validate the readout of all properties which are supported by the assets.
- Validate all asset settings according to instructions in our asset library.
- Based on the asset type, additional checks are performed:
- Solar & wind: Curtailment test to verify asset controllability and ramp rates.
- Meter: The report (e.g. magnitude of voltages and currents and the sign convention) is thoroughly validated, because this is critical when the meter is used for control strategies.
- Battery:
- The report (e.g. state of charge, energy data, sign convention, reporting frequency) is thoroughly validated.
- Discharge and charge test with different setpoints.
- If available, remaining modes of operation are tested (e.g. a FCR test)
- A report of the SAT is made and sent to the customer.
Start asset control
Based on the information provided in the SAT, the party that is responsible for controlling the asset(s) will typically test whether it is able to control the asset(s) and start steering the asset(s).